Contents
The efficiency of your air conditioning (AC) unit depends entirely on how clean its internal components are. When dust and grime build up on the filters and heat exchangers, your AC can lose up to 30% of its cooling power. Regular cleaning helps restore the unit to its peak performance. However, with the cost of professional AC servicing rising in recent years, more and more homeowners are considering a DIY clean. In this guide, we will look at when a DIY clean is effective, what you can safely clean without risking damage to the unit, and when it is time to call in the professionals.
Telltale Signs Your AC Needs Cleaning
The need to clean your air conditioner is usually signalled by a mix of direct and indirect symptoms.
Direct signs:
- Reduced airflow: Clogged air filters, a dirty evaporator coil, or a dusty fan wheel in the indoor unit will restrict the normal circulation of air.
- Poor cooling performance: A layer of dust on the heat exchangers insulates the coils, reducing heat transfer and stopping the room from cooling down properly.
- A sour or musty smell: Dust, moisture, mould, and bacteria multiplying on the evaporator coil or in the drip tray will produce unpleasant, stale odours.
- Water dripping from the indoor unit: A blocked condensate drain pan or drain line will prevent water from escaping, causing it to overflow into your room.
Indirect signs:
- Spike in energy bills: Clogged filters and coils force the compressor and fans to work twice as hard, significantly increasing electricity consumption.
- Frost or ice forming on the coils: Along with potential refrigerant leaks, a heavy buildup of dust on the filters and evaporator coil can cause the unit to freeze up.
- Increased operating noise: Dirt accumulating on the cylindrical blower wheel can unbalance it, causing annoying vibrations and rattles.
While indirect signs can sometimes point to other mechanical faults, a drop in airflow, poor cooling, and a musty smell almost always mean it is time to clean the indoor split unit.
What Grime Accumulates Inside Your AC and Why It Is Dangerous
During normal operation, an AC unit circulates massive volumes of air every single day. Along with the air, various airborne contaminants are drawn inside, settling on the filters, coils, blower wheel, and drain line. Every time you turn the unit on, some of these particles are blown back into the room with the cold air, lowering indoor air quality and posing a potential health risk.
- Household Dust: In high concentrations, dust particles can irritate your eyes and respiratory tract, causing coughing, sneezing, and triggering allergy flare-ups.
- Grease and Cooking Oils: If your AC is installed in a kitchen or an open-plan studio flat, microscopic grease particles from cooking will be drawn into the unit. When mixed with dust, this grease forms a sticky, stubborn film that traps allergens and bacteria.
- Pollen, Pet Hair, and Fabric Fibres: For allergy sufferers, pet dander and pollen circulating through a dirty unit can trigger sneezing fits, watery eyes, and allergic rhinitis or asthma attacks.
- Mould, Fungi, and Bacteria: The constant moisture on the evaporator coil and in the drain pan creates a perfect breeding ground for mould and bacteria (such as Legionella). Breathing in their spores can lead to nasal congestion, sore throats, coughing, and serious respiratory infections in those with weakened immune systems.
What You Can Safely Clean Yourself Without Ruining the Unit
A DIY clean is only suitable for removing surface dirt that can be reached without dismantling the structural casing of the AC. If you follow the manufacturer’s instructions, this basic maintenance is perfectly safe and helps keep your unit running efficiently. You can clean the following:
- The Air Filters (mesh filters): Easily accessed by lifting the front cover of the indoor unit; these can be washed under running tap water or brushed clean with a soft brush.
- The Front Cover and Outer Casing: Can be wiped down with a soft microfibre cloth and a mild, non-abrasive detergent.
- The Air Louvres and Vanes: Surface dust on the air outlet flaps can be wiped clean with a soft cloth or duster.
- The Condensate Drip Tray (if easily accessible): Clearing away minor slime and dirt without taking the unit apart.
- The Evaporator Coil (surface clean only): You can gently vacuum loose dust off the aluminium fins using a soft brush attachment, or brush it away with a soft paintbrush, being extremely careful not to bend the delicate fins.
Warning: Trying to fully dismantle the indoor unit, pressure-wash the coils, or use harsh household chemicals can easily ruin your AC. On many modern units, the drain pan and drainage channel are deeply integrated and cannot be reached simply by lifting the front cover. Cleaning them requires partial disassembly of the chassis, which is best left to a professional service technician.
Tools and Cleaning Products Needed for a DIY Clean
You do not need specialised professional equipment for basic AC maintenance. In most cases, standard household cleaning items will do the job:
- A soft paintbrush: For dusting the delicate fins of the heat exchanger and tight corners.
- A vacuum cleaner with a soft brush attachment: For safely lifting loose dust without bending the aluminium fins.
- Microfibre cloths or a soft sponge: For wiping down the outer casing and louvres.
- A flexible pipe cleaner or wire: For clearing the drain line if it is accessible without dismantling the unit.
For wet cleaning of the accessible parts, warm water is usually all you need, or a mild soapy solution for slightly greasy grime.
Some appliance brands and cleaning guides suggest using domestic steam cleaners or aerosol AC sprays. However, experts are divided on their effectiveness:
Domestic Steam Cleaners
A standard household steam cleaner often only softens the dirt but lacks the pressure required to wash it out from deep within the evaporator coils. Furthermore, the hot steam condenses instantly into water, which can easily run onto the electronic control board or sensors, causing a short circuit.
Aerosol AC Cleaners
Specialist AC cleaning sprays are viewed with caution by technicians. While advertised as a quick fix, they only treat the very surface of the coils. To actually remove the dirt dissolved by the spray, the coils must be thoroughly flushed with water. Without a proper rinse, the chemicals stay trapped inside the unit. In addition, the strong perfumes used in these aerosols irritate about 25% of users, especially those with asthma or allergies.
Common Mistakes Made by Homeowners
In a rush to get the unit as clean as possible, homeowners often rush and make critical mistakes:
- Cleaning the unit while it is plugged in: This greatly increases the risk of electric shock or short-circuiting the electronics.
- Using stiff brushes, metal scourers, or abrasive tools: These will easily bend the delicate aluminium fins or scratch the plastic casing.
- Pressing too hard on the coil fins: Bending the fins restricts airflow and reduces the cooling efficiency of the AC.
- Trying to dismantle the indoor unit without experience: You risk snapping the plastic clips on the casing or being unable to reassemble the unit correctly.
- Washing internal parts with water: Getting water on the electrical control board or sensors will ruin the appliance.
- Using harsh chemicals (like bleach or strong kitchen degreasers): These can corrode the aluminium coils, melt plastic parts, and ruin rubber seals.
- Reinstalling wet air filters: Putting damp filters back into a closed unit encourages rapid mould growth and musty smells.
Step-by-Step DIY Cleaning Guide
- Turn off the AC using the remote control. Wait for the unit to shut down completely (the horizontal louvre will close and the fans will stop). Once fully shut down, unplug the unit from the wall socket (or switch off the dedicated circuit breaker in your fuse box).
- Gently lift the front panel of the indoor unit until it clicks into place. To do this, locate the recessed handles on the sides of the panel and pull them gently towards you and upwards.
- Slide out the mesh air filters and wash them under running lukewarm water. For stubborn dirt, you can use a mild soapy solution.
- Allow the filters to dry completely. To speed things up, you can gently pat them dry with a clean cloth or paper towels.
- Clean the evaporator coil using a soft paintbrush and a vacuum cleaner with a soft brush attachment. Use them together: use the brush to gently loosen dust from between the fins, and the vacuum to capture the dislodged dirt.
- Slide the bone-dry mesh filters back into their slots and close the front panel, pressing gently until it clicks shut.
- Wipe the air intake grille on top of the indoor unit casing with a slightly damp microfibre cloth.
- Turn the AC on briefly so the horizontal louvre swings fully open, and gently wipe its inner surface.
- (Optional) If accessible, clean the condensate drip tray. Drain any standing water, clean the tray with a mild soapy solution, and dry it thoroughly.
What Grime Cannot Be Removed Without Professional Equipment
While a DIY clean will make your AC run better, it is not a complete fix. A basic clean cannot achieve 100% hygiene, as the following issues remain deep inside the unit:
- Deep-seated dust and fibres: Dust, pet dander, and fibres remain trapped deep inside the layers of the evaporator coil, on the cylindrical blower wheel, and on the back wall of the chassis.
- Grease buildup: The sticky grease film (common in open-plan flats) on the blower wheel and coils cannot be brushed away and requires chemical washing.
- Deep mould and bacterial biofilm: Hidden mould and bacteria continue to thrive in the damp, dark recesses of the evaporator and inside the drain line.
These remaining deposits act as a magnet for new dust, meaning your AC will clog up again very quickly. Furthermore, untreated mould and bacteria will continue to blow into your room, risking your health and causing musty smells to return.
What a Professional AC Deep Clean Involves
A professional clean is much more thorough than a DIY job. It involves specialised tools, chemical cleaners, and partial disassembly of the unit. By taking the indoor unit apart, the technician gains full access to all internal components, allowing them to wash away grime that is impossible to reach at home.
A professional deep clean typically includes the following steps:
- Dismantling the indoor unit: The technician removes the front panel, mesh filters, louvres, and the main plastic chassis cover to expose the evaporator coil, blower wheel, and drain pan.
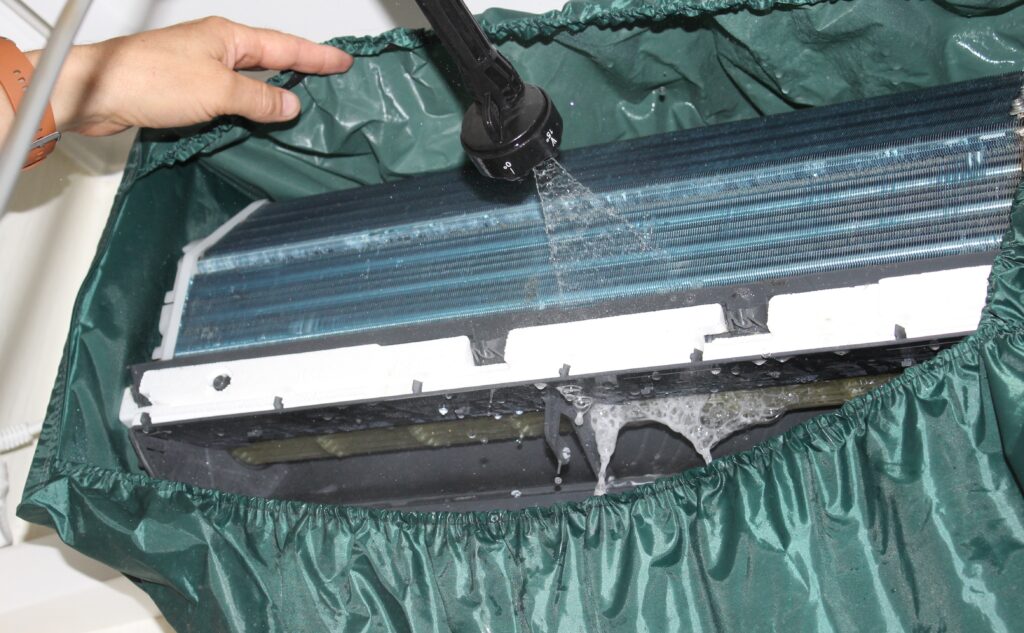
- Fitting the protective wash cover: A waterproof service bag with a built-in drain hose is fitted around the indoor unit. This funnels all the dirty wash water directly into a bucket, keeping your walls, furniture, and carpets completely dry and clean.
- Chemical treatment and pressure washing: A professional, self-rinsing coil cleaner is sprayed onto the evaporator coil, blower wheel, and drip tray. This is then thoroughly flushed with warm water using a specialised, low-pressure portable jet washer designed for AC units. This completely washes away all grease, mould, and chemical residue.
- Drying the components: The internal parts are dried using hot-air blowers or service dryers to prevent any moisture buildup.
- Reassembly and testing: The technician reassembles the unit and checks the louvre movement, drainage flow, cooling efficiency, and checks for any unusual noises.
What Else Is Included in a Professional AC Service?
Many technical faults are difficult for homeowners to spot until it is too late, leading to expensive repairs. During a professional service, the technician will carry out a full diagnostic check on your system, including:
- Cooling efficiency: Measuring the temperature difference between the air entering and leaving the indoor unit.
- Refrigerant pressure and levels: Checking for micro-leaks or low refrigerant charge.
- Pipework integrity: Inspecting the copper pipe connections for signs of leaks or wear.
- Compressor and fan operation: Checking for unusual noises, wear on bearings, or excessive vibrations.
- Condensate drainage check: Ensuring the drain line is clear and water flows freely.
- Bracket and mount checks: Making sure both the indoor and outdoor units are securely mounted to prevent vibration noise.
- Outdoor pipe insulation: Inspecting the protective insulation on the copper pipes outside. UV rays and weather degrade this insulation over time, causing energy loss.
Tip: If you would like a full system diagnostic check, let the company know when booking. This allows the technician to allocate enough time and bring the correct diagnostic tools (such as manifold gauges and leak detectors).
Servicing the Outdoor Condenser Unit
Some technicians do not recommend cleaning the outdoor unit as often as the indoor unit, especially if it is mounted high up on a wall. Unlike the indoor unit, the outdoor heat exchanger is not exposed to indoor dust, cooking grease, or household bacteria. In most cases, simply clearing away leaves, twigs, and large debris that block the airflow is enough.
However, the aluminium fins on the outdoor unit do get clogged over time with road dust, pollen, soot, and sand. The lower the unit is mounted (e.g. on ground floor patios or balconies) and the dustier the area, the faster it will clog. If access is safe and straightforward, cleaning the outdoor unit is recommended at the following intervals:
- Ground to 2nd floor: Once a year.
- 3rd to 6th floor: Every 2 years.
- 7th floor and above: Every 3 years.
A professional clean of the outdoor unit involves removing the protective grille, applying a heavy-duty coil cleaner, and pressure-flushing the condenser coil.
DIY Outdoor Unit Maintenance
If your outdoor condenser unit is safely accessible on a balcony or patio, you can periodically sweep away dry leaves, pollen, and large debris from the protective grilles using a soft brush (with an extension pole if needed). It is also a good idea to check that the end of the outdoor condensate drain pipe is clear of dirt or blockages.
Conclusion
Regular DIY filter cleaning combined with a professional service every 1–2 years is the best way to keep your air conditioner running efficiently, keep your energy bills low, and protect your health.
While home maintenance is essential for keeping visible parts clean, it cannot replace a professional deep clean, which is needed to sanitise the hidden parts of the system.