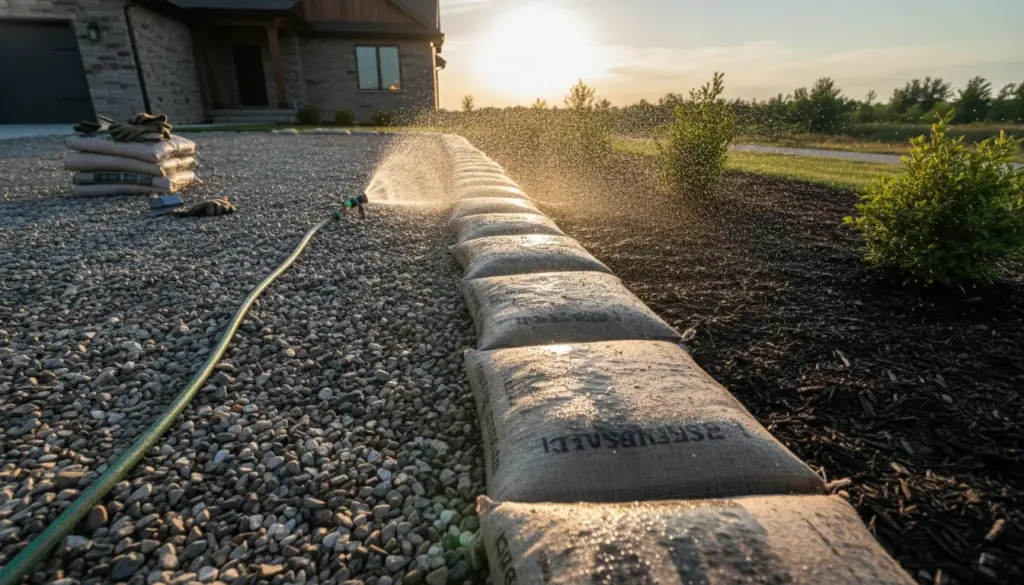
The Secret to Perfectly Contained Driveway Gravel
Homeowners and savvy DIY enthusiasts are increasingly turning to ordinary sacks of ready-mix concrete for a brilliant landscaping hack. By simply placing them along your driveway and soaking them with water, these unassuming bags transform into solid, heavy-duty “stones.” Once cured, they create a formidable barrier that keeps loose gravel perfectly contained.
Why Your Driveway Doesn’t Look Like Social Media
Scrolling through home improvement feeds, you will spot flawless driveways featuring razor-sharp borders and premium paving stones. Yet, in real life, most residential gravel inevitably migrates into the lawn. Every pass with a leaf blower or sweeping brush pushes those tiny stones further into your grass.
Having a messy perimeter is actually more disruptive than you might assume, especially since the transition zone between your yard and the pavement is highly visible to guests. Establishing a solid border does wonders:
- Locks materials in place: Keeps crushed stone, split gravel, and pebbles firmly in their designated area.
- Blocks invasive growth: Actively stops creeping turf and stubborn weeds from invading your driving space.
- Boosts curb appeal: Instantly adds architectural structure and clean lines to your front yard.
- Fights weather damage: Significantly reduces topsoil erosion during heavy downpours.
Ditching Traditional and Expensive Hardscaping
Historically, solving this landscaping headache required heavy concrete curbs or decorative brick pavers. While highly effective, traditional methods demand hefty budgets, vibrating plate compactors, perfectly leveled sand beds, and often a professional paving crew. Fortunately, the unopened-bag technique offers a remarkably effortless alternative.
Here is the core secret: you utilize standard bags of pre-mixed concrete—the exact kind sold at any local hardware store—as literal building blocks. You simply arrange the unopened sacks along your driveway edge, soak them thoroughly, and allow the material to harden straight inside the packaging.
This continuous row of solidifying bags creates a substantial, continuous curb that mimics the look of large, organic boulders. Best of all, you skip the messy mixing tubs and complex wooden formwork entirely. The benefits of this shortcut are impossible to ignore:
- Incredibly accessible: Forget about building wooden molds or calculating complex water-to-cement ratios. You just position the bags and turn on the hose.
- Highly budget-friendly: A standard 50-pound (roughly 22.5 kg) sack typically runs anywhere from $4 to $8, making this a highly economical weekend project.
- Lightning-fast execution: An entire property line can be laid down over a single weekend. After that, the concrete simply does the curing work on its own.
- Utterly flexible: If you dislike the placement of a specific block, you can easily dig it up and reposition it before fully landscaping around it.
Choosing the Exact Right Materials
Achieving professional-grade results requires picking the exact right supplies. Grabbing just any gray powder from the home improvement aisle will lead to disaster. As experienced hardscapers know, certain details matter immensely when attempting this trick.
Always purchase pre-mixed concrete, never pure Portland cement. You specifically need bags containing a proper blend of aggregate—meaning sand and gravel are already mixed in. Using unmixed cement yields incredibly fragile blocks that will crack and crumble under minimal pressure.
Pay strict attention to the wrapping. The outer bag must be constructed entirely of paper, completely devoid of any plastic liners or glossy interior coatings. Natural paper will easily decay and rot away over time, revealing the hardened shape beneath. A plastic barrier will repel your hose water, stopping the curing process, and the packaging will never degrade organically.
Your Required Tool Checklist
- Garden hose equipped with an adjustable spray nozzle
- Heavy-duty work gloves and protective safety eyewear
- Mason line or thick string to keep your edges perfectly straight
- A sturdy spade or shovel for trenching
- A rubber mallet or flat wooden board for leveling the wet bags
Laying the Foundation for a Flawless Edge
Flawless borders always start below the surface. Simply tossing heavy bags onto loose topsoil guarantees a wavy, sunken mess after a few harsh winters. Taking the time to create a compacted, well-draining foundation stops moisture from pooling underneath. This crucial prep step prevents devastating winter frost cracks and keeps your lines straight for decades.
Step-by-Step: Crafting Your New Driveway Border
Once your trench is prepared, start dropping your “stones” into place. The layout directly dictates your final aesthetic, so take your time.
1. Position the Sacks
Place each sack flat in your trench, with the widest side facing upward. Pro tip: Flip the bag so the side that originally rested against the shipping pallet faces up. This bottom section naturally collects finer sand particles during transit, resulting in a significantly smoother surface once fully cured. Push the units tightly together. Frequently check your string line to ensure everything stays completely straight. The bags will easily follow gentle curves as long as you guide them smoothly.
2. Puncture for Hydration
Grab a utility knife or a sharp screwdriver to puncture the top of each bag multiple times. These critical ventilation holes allow moisture to seep deep into the core of the dry mix. Keep it moderate; three to five deep punctures per sack are absolutely sufficient to guarantee thorough hydration.
3. Soak with Precision
Turn your hose dial to a gentle shower setting. Patiently mist each unit until the brown paper looks completely dark and saturated. Never use a high-pressure jet, as this will violently blast the cement powder right out of your puncture holes. Once thoroughly soaked, gently step on the bags or press them with a flat board. This flattens out harsh factory corners and ensures a uniform height across the entire row.
4. Let the Curing Begin
Within 24 hours, these newly formed blocks are generally solid enough to handle light foot traffic or careful gardening tasks nearby. However, concrete requires a full 28 days to achieve its maximum structural strength. During this initial month, keep vehicle tires and heavy landscaping machinery far away.
Over the next few weeks, sun and rain will naturally disintegrate the paper shell. If you lack patience, a pressure washer can safely blast away the remaining paper scraps once the initial 28-day curing phase concludes.
Pro Tips for Longevity and Style
Although highly durable right out of the gate, a few finishing touches can elevate the final look from a DIY experiment to a deliberate landscaping feature.
- Stains and sealers: Applying a specialized concrete paint or masonry stain helps blend the stark gray material with your home’s exterior colors or existing patio tiles.
- Decorative mulching: Pushing wood chips or ornamental pebbles up against the outer edge softens the harsh transition line and integrates the heavy mass into your garden.
- Strategic planting: Tucking creeping groundcovers between slightly curved sections lends the solid border a much more organic, aged appearance.
Crucial Limitations to Keep in Mind
Families with energetic pets or running children should prioritize yard safety by eliminating jagged corners. While the wet mix is still slightly workable under the paper, tamp the edges down firmly. Alternatively, use a grinding disc later to smooth away sharp points. This simple step prevents nasty scrapes during inevitable trips and falls.
In regions experiencing deep freezes, exceptional drainage is non-negotiable. Laying a thin gravel bed directly underneath your trench prevents the heavy blocks from heaving upward during hard frosts. Furthermore, traditional de-icing salts will slowly eat away at the concrete surface over the years. Opting for sand or pet-safe, salt-free melting agents will drastically extend the lifespan of your newly poured curb.
Finally, calculate your load carefully before starting a massive driveway overhaul. A line of fifteen 50-pound bags easily exceeds 750 pounds of dead weight. If your soil consists of loose peat or freshly dumped dirt, these heavy borders will eventually sink and require resetting. Ensure solid, compacted ground before you lay a single bag.
Ultimately, this foolproof technique extends far beyond driveway perimeters. You can use it to frame a meandering gravel walkway, outline a dedicated parking pad, or create neatly raised flower beds. The core rules never change: prioritize stability, ensure excellent drainage, and water with patience. Once you master the basics, you can dramatically redefine your property’s landscape on a shockingly small budget.